Shape
Copyright David & Cynthia Thomas, 2009
Drawing 3-Dimensional Objects--Concepts & Connections
Directed Activity 1-Point Perspective of a Tiled Floor. Many children love to draw but struggle with the technical difficulties inherent in representing 3-dimensional objects (e.g., houses) on 2-dimensional surfaces (e.g., paper). The key to resolving difficulties of this sort is an understanding of perspective geometry. Figure 6.17 illustrates one of perspective geometry’s most familiar features: Lines that are parallel in the real world appear to converge in the distance. One need only stand on a straight stretch of deserted road or railroad tracks to observe this phenomenon. The point to which the parallel lines and tiles in Figure 6.17 appear to converge is called the vanishing point. This figure is an example of 1-point perspective created using The Geometers Sketchpad and model 6_1Point.gsp.
|
|
Figure 6.17: 1-Point Perspective
Directed Activity 2-Point Perspective of a Box. A more elaborate representation is seen in Figure 6.18, created using 2-point perspective. In 2-point perspective, two sets of parallel lines converge to two different vanishing points. As a result, a sense of depth is created in two directions, making the object appear more 3-dimensional than in a 1-point perspective view. In this case, the sides of the cube are shortened to create an illusion of depth. Using the Geometers Sketchpad model 6_Box.gsp, you may move the vanishing points and vertex A and observe the effect these changes have on the apparent location and orientation of the cube.
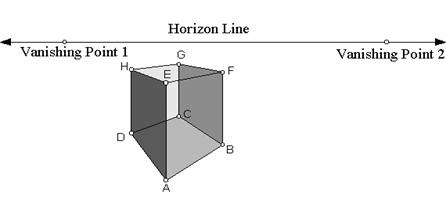
Figure 6.18: 2-Point Perspective
Using the Geometers Sketchpad, you may create your own perspective drawings. The following steps outline a procedure for creating a 2-point perspective view of a simple building.
Step 1: Draw a horizon line, then construct two points on the horizon line (see Figure 6.19). These points will serve as vanishing points for the sketch. From each vanishing point, draw a ray. These rays will contain the base of 2 walls of the house. Mark the point of intersection P1. The two vanishing points and P1 determine the plane on which the house sits.
Figure 6.19: Step 1
Step 2: Construct a line through P1 perpendicular to the horizon line. This line will contain the "front" edge of the house. Construct a point P2 on this perpendicular and position it above the horizon line. Draw rays from each vanishing point through P2. The plane determined by points P1,P2, and Vanishing Point 1 will contain one wall of the building. Likewise, the plane determined by points P1, P2, and Vanishing Point 2 will contain a different wall. Next, construct two lines parallel to P1P2 on either side of P1P2. These lines will determine the ends of the wall planes (see Figure 6.20).
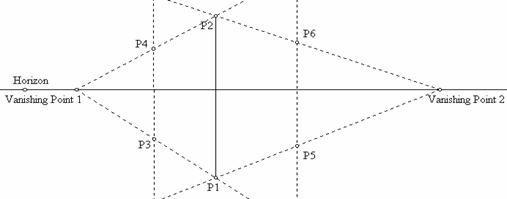
Figure 6.20: Step 2
Step 3: Add hidden lines by extending additional rays from the vanishing points and label points P7 and P8. Connect these points to the other corners as indicated and shade the faces to enhance the 3-dimensional appearance of the building (see Figure 6.1).
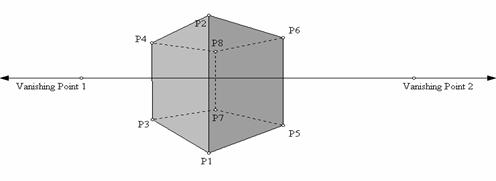
Figure 6.21: Step 3
Step 4: Locate the centers (P9 & P10) of two opposite faces by finding the intersection of the diagonals of each face. Construct lines through P9 and P10 parallel to the vertical edges of the box. Select a point on the nearer of the two lines to be the peak of the roof, labeling the point P11 (See Figure 6.22)
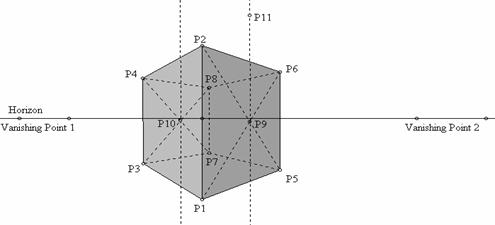
Figure 6.22: Step 4
Step 5: Extend a line from P11 to Vanishing Point 1. Find the intersection of this line with the other line drawn parallel to the vertical edges of the box. Label the intersection P12. Connect P11 to P2 and P6 and P12 to P4 and P8 to make the roof. Move P2 downward to achieve the perspective shown in Figure 6.23.
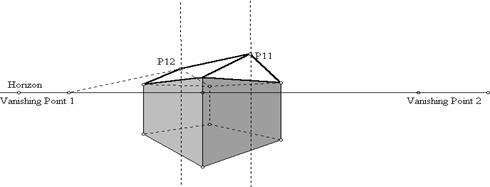
Figure 6.23: Step 5
Step 6: Add additional shading, experiment with moving P2 and the two vanishing points, and hide lines and labels as desired (see Figure 6.24). Compare your building to Geometers Sketchpad model 6_House.gsp.
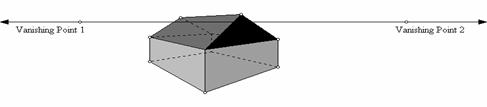
Figure 6.24: Step 6
Experiment with the Geometers Sketchpad model, varying the locations of the vanishing points and aspects of the building. What effect does moving the vanishing points away from the building produce? Toward the building? What about moving the center line P1P2? When you think you understand the interplay of these features, try a similar sketch using pencil and paper. Has your drawing skill improved?